It is what it is!
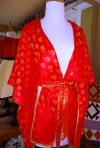
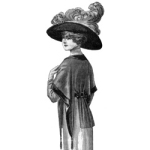
For my first official challenge with The Vintage Pattern Lending Library, 1912 Project, I received the Ladies Afternoon Wrap #0291, originally released February 4, 1912.
This is an absolutely gorgeous pattern that I may attempt to tackle with a different fabric, but for now, my version will just have to be my muslin. I should start at the beginning….
I had on hand a red and gold (cheap) brocade that I purchased when I was working on a local production of “The King and I”. By local, I mean no budget and I volunteer… It’s a pretty color with an interesting design, wonderfully drapey, and the reverse side of the fabric would be fabulous for the arm detailing and belt. I decided not to line mine and after cutting out the pieces (do not follow the cutting directions on pattern) I went to work. The pattern is straight forward and easy to follow, but remember I said MY fabric was cheap, so every easy task was made difficult from this point on.
I made the darts in the main pieces where marked, but I opted not to cut them open in the back as my fabric was already starting to fray like crazy. Yes, I did all the tricks you’re supposed to do to prevent this but my fabric just refused to cooperate. I just pressed the darts to one side and it worked fine. Next, the sleeve detailing. Oh won’t it be pretty with the gold reverse print against the red? But now that it’s going together, the reverse is looking really orange, so on to plan B, rip it out and go with the red fabric on red. Still looks pretty but boy is it fraying. I’m starting to get discouraged.
I stitched the back seam then stood back and admired how I matched the print (ooh and aah), is this going to work after all? The collar went together like a dream and the drapey effect is perfect. Cool, this IS going to work! Now on to the edges… I swear the edges were the bane of my existence for a week. I probably over thought it all, but I like the inside of my garments to look as nice as the outside. Starting at the front (big mistake) I first tried to roll a small hem by hand but didn’t like the way it was looking. Ripped it out. Then I made a bias strip from left-over fabric and attached it to the outside ends bringing it to the inside (think of binding a quilt edge), but it was looking too heavy. Ripped it out. The fraying at this point has me in tears and on my first drink. I found some gold trim in my stash and decided to attach it to the inside edge (as close as possible because I’m slowly losing my fabric and why did I start with the front?!) and brought it toward the outside to make a hem. I thought the gold would be a nice touch… it’s not, but it’s on. My front panels are now 2 inches narrower than they’re supposed to be – I’m really not liking this anymore. I will NEVER wear this, I’m not wasting my tassels…. My new mantra ‘This is my muslin, this is my muslin’. On to the second drink.

Wrap Front
The back went much better. I used the same gold trim but attached it to the outside edge and brought it to the inside and stitched it (like hem tape) and I was rather pleased with the results. And, no, it’s not because of the second drink.
My pattern review is as follows:
Pattern Description/Sizing
Vintage Pattern Lending Library, Ladies Afternoon Wrap #0291, Size 32 inch Bust
Did it look like the photo/drawing on pattern envelope?
It actually did… although I had problems with my choice of fabric, any issues were my own and not the fault of the pattern. It draped beautifully.
Were the instructions easy to follow?
Once I got past the initial incorrect pattern layout, yes. The collar section, once sewn, said to attach to neck edge but did not specify to right or wrong side. I opted the right side because I then applied trim/edging along outside and turned the seam allowance and trim to the inside. Is this correct? Not so sure but it worked for my method. Also, I felt the sleeve edge directions were a bit strange, but it worked out to be one of those details that you just follow blindly and ‘aha-light bulb’ it all works.
What did I particularly like or dislike about the pattern?
On a scale of 1-5, I would give this pattern a FIVE – I loved the drape, and depending upon belt and tassel options, it can be made to suit formal attire or dress up a pair of jeans for a night out. It’s deceivingly versatile.
Fabric used – don’t go there…
Pattern alterations/design changes.
Although I am a larger bust than the 32′ stated in the pattern, the dart placement worked out fine for me. Very forgivable design. The only adjustment I made was to elongate the front and back sections by about 2 inches.
Would I recommend this to others?
Absolutely! Especially for someone wanting a simply elegant piece to dress up an outfit, or a wonderful canvas for an ‘art to wear’ project. I think with a bit more clarification regarding some directions, this can be a great beginner pattern.
In conclusion – Would I sew this again…. yes, but definitely with a different fabric. Taking a cue from Tim Gunn, I WILL make it work (at a later date). I’m actually having such a blast with all of this, missteps and all! Thank you, Janyce and Kim.


This almost looks boudoir… 🙂
Brocade can be quite frustrating with it’s fraying! I almost always have to serge each piece individually before I start putting them together when I sew with brocade. Yours looks lovely though! Very kimono-like.
I’m getting ready to make my version of the wrap in the next couple days with a metallic continous brocade (meaning it has lots of floating threads on the backside) which I will definitely have to serge immediately after cutting.
Despite your trials and tribulations, it is beautiful. Because of your post, this may be the pattern I request next! Loved your “second drink” comment. Been there many a time.
Pingback: Ladies Wrap (#0291) « vpll1912project
Pingback: Reblog for Afternoon Wrap – It Is What It Is « vpll1912project
Now I see what it would look like in red… I made mine way back in early March the same way: no lining to be able to see the lovely reverse patterning. And I used the border up and down the back the way you did! My fabric was blue and gold! Nice job! :-))